Showing posts with label embroidery. Show all posts

Tuesday, February 07, 2012

Tiggers are wonderful things

I found some classic Winnie the Pooh cartoons on YouTube, which inspired me to start this piece. He's done completely in satin stitch, with french knots for eyes. I need to finish his body, then outline him with a single strand of black (like I've done to his head). I originally was going to write out the infamous Tigger song, but now I'm not too sure. What do you think? I definitely do need the practice embroidering letters.


Saturday, April 23, 2011

Progress on the Epic Pillow Project

The Epic Pillow Project (E.P.P.) is going well. It's really starting to develop some depth. I'm slowly filling in the light purple border with stitching. I'm anxious to practice my long and short stitch (and shading) so I'll have to see where I can fit that in.


The design doesn't look it, but it's still relatively small. I'm planning to complete the entire front, bit by bit.

Friday, April 22, 2011

The Epic Pillow Project

Here's the embroidery project I've been working on lately. The carousel horse towel still isn't finished, but I got started on the Epic Pillow Project anyway.


It's a white on white pillowcase with an awesome paisley pattern. The paisley pattern is so subtle that it's barely discernable, so I decided to embellish the pattern with embroidery. I'm ecstatic with how it's turning out, and I hope that by trying lots of different stitches and patterns I will be able to maintain my momentum and embellish the entire front of the pillow.


Colors: 3371, 848, SU1, 3822, 721, 3806, 718, 553, 824, threadworx 11382, threadworx 1154

Monday, April 18, 2011

Flashing My Embroidery Floss Stash

The new project photos are coming soon, I promise. In the meantime, I thought I would flash my stash. I'll add in my ribbons and hanks of floss in a bit. So here's all my DMC.

As a refresher, this is what it looked like before I found all that thread at Goodwill.


Here's what it looks like now. It has a lot more depth now instead of staying in my favorite color ranges (*cough*jewel tones*cough*).

The empty spots are from the colors I'm currently using in projects. I have a lot of projects going right now: the new project, the carousel horse, and finishing up another new project.

Sunday, April 17, 2011

Sneak Peak

Here's a sneak peak of what I've been working on lately.


More to come soon.

Thursday, January 27, 2011

The Carousel Embroidery has Begun!

I'm finally making a carousel horse using my embroidery pattern! I did end up making a few minor changes to the pattern, so I will upload the updated pattern shortly. I'm thinking of converting it into a pdf. If you download embroidery patterns, do you prefer jpegs or pdfs? I'd love to hear what you think.

I have these scrumptious towels that I found at Kitchen Kaboodle that I've been waiting to embroider. I'm using Nature's Kitchen Towels by asd living. They're 100% cotton. They have the same thickness as flour sack towels like I made my owl on, but they have a slightly more crinkly surface. I love their texture. The pack I purchased had three towels: white, black, and this gorgeous blue. I've decided since I want to make a white carousel horse the blue will be the perfect color.

I printed out my pattern and traced it with my iron-on pen.


Note that I traced out just the outline of the rectangles on the breast collar and sashing. My iron-pen did not have a fine enough point to do further detail. I will probably end up satin stitching them, so I just needed an outline.


Then I ironed the design onto the towel. I was debating resizing it to be a little smaller, but decided to keep the same dimensions. It's large but these towels are 28"x36" and I'm working on the short side, so I wanted the embroidery to balance out the long length.

Monday, January 24, 2011

My First Crayon Tinting

I embroidered this lovely mushroom. This is the first piece that I've crayon tinted.

Tips for crayon tinting:
  • Color the fabric with medium light pressure. When I read how to crayon tint, everyone said to use light pressure. Evidently my light pressure is a lot lighter than theirs. Mine was so light that I couldn't even tell if the crayon wax had melted because it was so light. I ended up coloring another layer on top of it and re-ironing. Then it was the desired shade.
  • If washing or wetting at all, color the fabric with medium (not medium light pressure). I used a washable blue pen for some of the lines and once the piece was finished I soaked it to remove the markings. Some of the wax color left as well. Not much, but enough to be noticeable. Therefore next time I'll color a little darker.


Colors:   824 | 3765 | 945 | 321 | 3853 | 600 | 3765 | white

Wednesday, January 19, 2011

Super Secret Embroidery Swap Project

I sent out the super secret swap project, and my swap partner has received it! Unfortunately I mixed up the date (I thought the send outs were 1/15) so it's a few days late. I feel really horrible about it. It was my first swap, and I'm one of those swappers. As soon as I discovered my mistake, I emailed the moderators and my swap partner. Hopefully she's not too upset with me. Fortunately, I'm very proud of the project I created for my partner, so at least I won't be a swapper who sends a project that they spent 20 minutes on.


I used a design I found in her wist. I saw that her wist had a lot of gnomes and several rainbow projects. I decided to combine the two.


The most time consuming part of this project was the roof. I filled it in using parallel rows of backstitch. The window is done in satin stitch.

I used this great tutorial in order to cover the back of the hoop. I traced the inner hoop onto the green fabric, cut it out, sewed it right sides together with a 1/8" seam, turned it right side out then ironed it. Between sewing the seam and ironing the backing ended up smaller than I would have liked, so next time I'll trace the outside of the outer hoop. That should leave me more allowance for the seam and ironing.

Before I sewed the two green pieces of fabric together I embroidered the name of the swap and my username on the back. Next time I need to do the embroidery first, before I cut out the circle. Trying to embroider a 3.5" piece of fabric was not fun. I used my tiny 2.5" embroidery hoop but I had to keep moving the hoop as I stitched additional letters. This made my letters really wonky. I definitely need more practice embroidering letters.


The outer hoop is outlined with a rainbow braid. I wanted something to tie the colors together, and emphasize the fact that it's made with colors of the rainbow. I braided one piece of red, orange and yellow together, three pieces of green together, and one strand of blue, indigo, and violet together. Then I braided all of them together, creating a fantastic rainbow braid.


I really hope she likes the project! I spent a lot of time on it and I was almost tempted to keep it!

Colors used:
550 | 820 | 702 | 973 | 721 | 304 | 718

Sunday, January 09, 2011

Free Embroidery Motif from Aimee Ray

Did you hear? LarkCrafts and Aimee Ray are partnering up to give away a free embroidery motif every week from Aimee's new book Doodle Stitching: the Motif Collection.

 Aimee Ray is a great artist with a fantastic taste for color. It's part of a stitchalong for the month of January. If you'd like to share your interpretation of the pattern, she's started a Flickr group.

I love the first available pattern, the Gnome and the Mushroom. I'm not sure if I'll have time to participate in the stitchalong, but I will definitely embroider the pattern sometime in the near future.

The Pirate Santa Embroidery is Finished!

I finished the pirate santa! I spent about six hours embroidering last night, primarily working on the swap project and then finishing up the pirate santa. I'm not sure if it's due to the curves or the black outline on the really dark navy fabric, but I really dislike embroidering letters. It's not fun at all. I finished the main character of the santa over a month ago. All I had to complete was the letters, yet this embroidery project has sat in my workbasket for over month.
The letters are finally complete. Now that I'm looking at the photos I think I might fill in the word rum with a light green. I haven't fully decided. I'm tempted to just leave it as it is. 

Colors Used: 
413 | 321 | 975 | 699
3852 | 905 | white |black
In other exciting news, the swap project is almost done. I just need to embroider one little piece, about an inch in width. All of the foreground and background is complete. I spent about four hours trying to finish it up last night. I didn't manage to finish it all, but it was incredibly close. Now I need to decide how or if I'm going to decorate the small 4" hoop. Then I can send it off to my swap partner.

Part of my push to get the swap done is because my swap partner has already finished her hoop, and sent it off to me! My swap partner sent me this adorable butterfly! She chose the colors incredibly well. Look at that gorgeous satin stitch!


The purple flowers remind me of the wisteria we had at the house I grew up in. My dad built an arbor in front of the house and planted wisteria. Within a few years wisteria had completely taken over the arbor and the surrounding fence. I love the smell of wisteria in the summer. The flowers were simply beautiful.

Tuesday, December 07, 2010

Free Carousel Embroidery Pattern

Here's the Carousel Embroidery Pattern. I'm very proud of it, especially since it's my first pattern. Even though it took a lot of time, I think I'm addicted to making embroidery patterns. I would love to have a collection of my own unique embroidery designs. That would be fantastic.

I love how the detailing on the body of the carousel horse turned out. It took me a lot of hours to do, but I think it will really pay off when I stitch up this carousel. I just could not find any carousel embroidery patterns that I liked. This is a time when being an avid horse lover and rider works against me. I wanted something that was cute and fancy, but that also had the conformation of a real horse. Many of the carousel patterns I found were very distorted or over/under stylized. This one suits me perfectly.

The full size pattern is 6 1/2 inches wide by 7 1/4 inches tall. If anyone is interested, I can send you a smaller or larger size.

Feel free to take bits and pieces of the pattern, to mod it out or simplify it. I'd be ecstatic to see different interpretations of the pattern. I do ask that if you use this pattern that you:
1)
Give me credit for the design and 2) Don't use it for commercial profit.

To transfer the pattern: Print out a copy of the pattern. Use your favorite transfer method in order to copy it to your fabric. I prefer Sulky Transfer Pens, but a lightbox (or the window - the poor man's lightbox) also works well for lighter fabrics.

The ever evolving list of projects to create

- Start a Hoopla Wall - a wall decorated solely by finished embroidery pieces in hoops - or frames if I figure out how to do it. I love the colors of the first photo, but the like the tight placing of the hoops in the second.

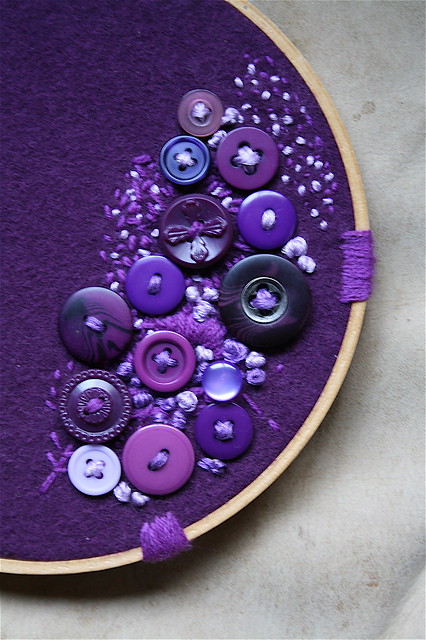
- Incorporate buttons into an embroidery project - I certainly have enough buttons! Look at the pretty purple! I would love to do something like this, except I'd probably make the design take up more of the hoop.

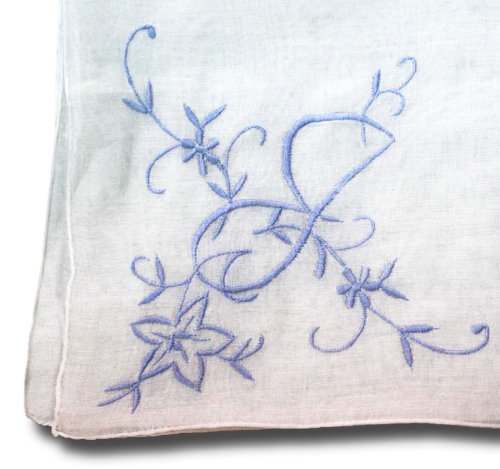
- Embroider a linen handkerchief. I'm not sure what it is about handkerchiefs as I've never had one before, but I'd really like to make one. A tasteful one of course.

- Do a stitch of the week - Choose a new stitch each week to highlight and experiment with. Do a sampler with all the stitches of the week?

Carousel preview

The carousel pattern is done! It took a lot longer than I had anticipated, as I ended up redrawing the entire thing. However, I learned a lot and now I am much more comfortable with the pen tool. I actually had a lot of fun creating it. I'd like to make some more of my own embroidery designs.

Here's a preview of the design. The full design will be coming soon.

Saturday, December 04, 2010

Carousel wins!

I've decided I'm going to do the carousel first. I want to do the radish in a smaller hoop, probably around 4". I have a 4" hoop, but I want to have that hoop available for the swap. Until I'm assigned a swap partner I won't know the design I'll use nor the hoop size.

For the fabric, I'm going to try to use cut up the large white flat sheet I got at the thrift store. I bought it because the texture reminded me of flour sack towels. I didn't try the needle test on it, just eyeballed it. Hopefully it will work out. If not, I'm down all of a $1.50. I'm really glad I found that specific thrift store. Their stuff is actually thrift store priced, unlike Goodwill who often charges more for a used item than you can buy it for new. So far I've found a fabulous black polka dot peacoat, the flat white sheet, and I went there on Thursday and found some more great stuff. I'll post that tomorrow, when I can take photos in the sunlight.

So, carousels. I've done quite a bit of Google image searching in the past few days. When searching for a new project, my design background really comes in handy. I find a lot of images, but none of them are the 'perfect' carousel horse. At the least they need a color change. However, most times I want to take bits and pieces from all of them to create my version of a carousel horse.

So far, I like the head on this one the most. I love the bridle, but the reins ending at the crest of the neck really annoy me. If I brought them down to the base of the neck while maintaining that style I think that would be pretty.

I love the saddles, saddle pads and extra stuff on these two. What on earth do they call all that decoration? Even as a rider I don't know. It's pretty, but it's also fake. It looks stenciled on. Clean lines with no dimension. I think I like that. In the photo above it looks like a real horse. That's fabulous, and I think eventually I'll make one like that, but right now I want something stylized. I'm not sure if I want it as clean as it is. I don't know if I want a little more realism.

So now I just need to combine bits and pieces of these, convert them to line drawings, and then make a transfer pattern out of it. Or I might just get lazy and just use one of these drawings instead of combining them.

Thursday, December 02, 2010

Carousel vs Turnip - or How do I decide what to do?

Carousel or Turnip, that is the question. Okay, so a little explanation might be needed here. I am trying to decide on my next project. The pirate santa is nearly completed. The entire illustration is done, and all that is left to do is the words. As I'm so close to being finished it's time to start a new project.

I really want to make a carousel hoop. I'm working towards having a hoopla wall, and I think a carousel would be a fantastic addition. They are beautiful and colorful. It doesn't hurt that when I was a little kid I was obsessed with them and frequently collected them. I had carousel statues, carousel music boxes, and even had carousels stenciled on the walls of my room. Now I'm 22, and it's been many years since I have enjoyed carousels or had them in my room. My taste has changed, and I'm very proud of the way my room is decorated. It's very adult and colorful, very me.
Now that I've been away from them long enough, I'm thinking it's time to bring a carousel into the decor. I hunted down a bunch of photos of carousel horses I liked. I know I want a white horse with an ornate saddle and blanket.

Or I could go a completely different direction. I am a huge British TV addict. More than half the TV shows I own are British. About a fifth of the movies I own are British as well. In my perusal of all things British one particular tv show kept popping up. Blackadder. I've known of it's existence for years. However, I have this thing about movies pre-1987. It's excruciating to watch them. I cannot get past 'old' special effects. I just can't. I become so focused on the special effects that I completely tune out the movie. Blackadder started in 1983, so I avoided it. Then I somehow stumbled upon a clip of Rowan Atkinson on YouTube. He was playing the Blackadder character and was absolutely hilarious.

I quickly watched all of Blackadder, all 5 seasons. It was fantastic. I really want to make an embroidery of one of the quotes in that show. Specifically, "It's my dream turnip".

Decisions, decisions.

Tuesday, November 30, 2010

Needle Book

I spent several hours today making a needle book! I found a really basic pattern by Martha Stewart, and I picked up felt yesterday to make one. I spruced the pattern up quite a bit by using a great button, embroidering the front, and using two colors for the cover and interior pages.

I used royal blue felt for the cover and a great lighter blue for the strap and the inside pages. It made six pages total. I really like the contrast between the lighter blue and the royal blue. When I started it I debated using the contrasting color for the strap and I'm glad I did. The cover is embroidered with lazy daisies. At first I was going to do the whole cover, but I really liked how the triangle looked instead. Plus, I think a whole cover of lazy daisies would be too much.

The binding is lime green floss, all six strands. I used a large tapestry needle to do the binding. While it was blunt, it was the only thing that could go through 8 layers of fleece easily.

Here's a closeup of the button. These were a major influence on the color scheme I decided on.

Monday, November 29, 2010

Embroidery hoops taste delicious

I purchased a few embroidery supplies today. Two cheap 8" hoops (1 from Michaels, 1 Mill End) for my soon to be hoopla wall, and a small red 2.5" plastic hoop because I couldn't resist its cuteness. I also found a couple pieces of felt and some adorable buttons so I can make a needle case.

Evidently, Delia thinks that embroidery hoops are delicious.

See hoop.

Want.

Attack!

Yummy. This tastes good!

She attacked one the second she saw it. It's the strangest thing; I've been embroidering for several weeks now yet she ignores the hoop I'm working on. I don't know if she just likes the "cheap" hoops I purchased today, or if she has decided that embroidery hoops should become a part of her daily diet.

Sunday, November 28, 2010

My first swap

I've joined an embroidery swap on Craftster! I joined the site many years ago, and while I'm relatively active in the forum I had completely forgotten they did swaps. When I posted my owl in the Completed Projects board several people encouraged me to join the upcoming embroidery swap.

I thought about it for several days. Money is very tight, and I'm still trying to find a job. When I do find a job I'll be working a lot of hours, leaving less time for crafting. Add in the holidays and needing to make Christmas presents and I wasn't sure I could commit to a swap. However, it's a mini-hoop swap. The hoop has to be between 2"-4". A regular sized hoop would be too much, but a small one I can definitely do!

Photo by http://www.etsy.com/shop/beckarahn - Check out her stuff, it's adorable!

Signups end on Dec 7th. The last day for mailing the hoop is Jan 10.

Pirate Santa

Here's what I've been working on this week.

I got this pattern from UrbanThreads, which is incredibly awesome. They have some great patterns. I had a heck of a time trying to transfer this pattern onto the navy. I use my black sulky transfer pen to transfer my embroidery designs, but the navy is too dark for the black pen. So I tried my white sulky pen for the first time. Yuck. I spent over 10 minutes just trying to get the ink to start. Once I did, I traced the design and then ironed it to the fabric. It did not transfer well at all. I spent more than double the time ironing the design than I do with the black, and it still didn't work. The lines were jagged and so interrupted that it was unsuitable for embroidery. I tried going over the lines in chalk, then I tried a blue wash out pen. Still no luck.

In the end I used my trusty black transfer pen. The lines were clean, but the navy is so dark that it was a lot harder to see the lines. I need to find a white transfer pen that works. Until I do, I'll be sticking to lighter fabrics.

Wednesday, November 24, 2010

Chrysanthemums

As soon as I finished my owl, I wanted to start another project. I decided to start a pillow with chrysanthemums running up the edge. I did stem stitch for the leaves and satin stitch for the petals. This was my first time doing satin stitch.

At first my satin stitch was a little wonky.

But it got better as I kept working.

Related Posts Plugin for WordPress, Blogger...